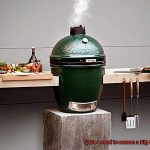
TiYou’ve just snagged yourself a shiny new Weber smoker, huh? Well, hold your horses before you start slapping those ribs on the grill. We need to have a little chat about something that can take your smoking game to the next level: seasoning your Weber smoker.
Now, I know what you’re thinking. “Do I really need to bother with this seasoning stuff?” And trust me, I get it. When you’ve got that hankering for some mouthwatering smoked goodness, who wants to wait around for an extra step? But here’s the thing – seasoned pitmasters swear by this process. And if they’re willing to go the extra mile for flavor perfection, shouldn’t we give it a shot too?
In this blog post, we’re going to dig deep into the art of seasoning a Weber smoker. We’ll uncover why it’s so darn important and how it can unlock a whole world of smoky deliciousness. Plus, I’ll throw in a few expert tips and tricks to ensure you’re making the most out of your new grilling companion.
So, grab yourself a cold one, kick back in your favorite lawn chair, and let’s dive headfirst into the wonderful world of Weber smoking perfection.
Contents
What is Seasoning a Smoker?
Whether you own a Weber smoker or any other brand, this essential guide will walk you through the process and significance of seasoning.
Seasoning a smoker involves coating its interior surfaces with oil or fat and heating it to create a protective layer. This process accomplishes three things: removing manufacturing residues, creating a non-stick surface, and safeguarding against rust and corrosion.
Benefits of Seasoning:
- Enhanced flavor: Seasoning imparts the smoky aroma to the metal surfaces, elevating the taste of your future cooks.
- Safety first: By removing manufacturing residues, seasoning ensures that your food won’t be tainted by unpleasant flavors or harmful substances.
- Non-stick convenience: A seasoned smoker makes cleaning a breeze, reducing the need for tedious scrubbing and scraping.
- Rust prevention: The high heat used during seasoning seals the metal surfaces, shielding them from rust and corrosion.
How to Season Your Smoker:
- Thoroughly clean the interior surfaces.
- Apply a thin layer of suitable oil or fat (e.g., vegetable oil, canola oil) using a brush or cloth.
- Preheat the smoker to 275-300°F for a couple of hours to allow the oil to penetrate and bond with the metal.
Additional Tips:
- Research your specific smoker model for any unique seasoning requirements.
- Periodically repeat the seasoning process, especially if signs of rust or deterioration appear.
- While Weber smokers come with a protective porcelain enamel coating, seasoning still provides added benefits.
Benefits of Seasoning a Weber Smoker
Then it’s time to delve into the wonderful world of seasoning your Weber smoker. Trust me, this is a step you don’t want to skip if you want to achieve that perfect smoky flavor and ensure your smoker stays in pristine condition.
First and foremost, let’s talk about heat distribution. When you take the time to season your Weber smoker, you’re essentially creating a smooth and even cooking surface. Say goodbye to worrying about those dreaded hot spots or flare-ups that can ruin your culinary masterpiece. Your food will cook evenly, resulting in mouthwatering, restaurant-quality dishes every single time.
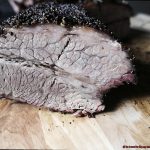
But that’s not all – let’s talk flavor. Seasoning your Weber smoker is like adding a secret ingredient to your meals. As the oil from the seasoning process bakes into the metal, it imparts a subtle yet tantalizing smoky flavor to your food. It’s like giving your dishes that extra oomph that will make your taste buds do a happy dance.
Now, let’s address the issue of cleaning up after a grilling session. We all know it can be a bit of a hassle, but fear not. When you season your Weber smoker, you’re actually making cleaning easier. The layer of oil created during the seasoning process acts as a protective barrier between the metal and the food. This means you can effortlessly remove any stuck-on residue or stubborn grease with minimal scrubbing. Less time spent cleaning means more time spent savoring your delicious creations.
But wait, there’s more. Seasoning your Weber smoker also helps to prolong its lifespan. By creating a protective layer on the metal surfaces, you’re effectively preventing rust and corrosion from taking hold. This is particularly crucial if you reside in a humid or coastal area where moisture in the air can wreak havoc on your beloved smoker. With proper seasoning, your Weber smoker will remain in prime condition, ready for countless grilling adventures.
How to Season a Weber Smoker
If you own a Weber smoker, get ready for a treat. Before you embark on those mouthwatering smoking adventures, it’s crucial to season your smoker. Seasoning creates a protective layer, prevents rust, and elevates the flavors of your cooked foods. In this comprehensive guide, we’ll walk you through the simple steps to season your Weber smoker like a seasoned pro.
Step 1: Clean and Dry:
First things first – give your Weber smoker a thorough scrub with warm soapy water and a gentle sponge. Rinse it meticulously and let it air dry completely. This crucial step ensures the removal of any manufacturing residues or lingering odors before seasoning.
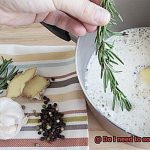
Step 2: Oil Up:
Next, grab your favorite cooking oil or fat (such as vegetable oil or lard) and apply a thin, even layer all over the interior surfaces of the smoker. Don’t forget to generously coat the cooking grates, water pan, and charcoal grate if applicable. This infusion of oil not only protects against rust but also creates a non-stick surface that makes cleaning a breeze.
Step 3: Fire It Up:
Now it’s time to ignite the flames. Preheat your Weber smoker to around 250°F (120°C) and maintain this temperature for approximately 2-3 hours. The heat works its magic by allowing the oil or fat to penetrate deep into the metal, forming that coveted protective layer. During this process, don’t be alarmed if you see wisps of smoke or catch whiffs of tantalizing aromas – it’s all part of the enchantment.
Step 4: Cool Down and Wipe Off:
Once you’ve hit the mark on seasoning time, turn off your smoker and let it cool down completely. When it’s cool to the touch, grab a paper towel or a soft cloth and gently wipe away any excess oil or fat. This step ensures that your food won’t taste greasy and keeps your smoker looking pristine and glossy.
Step 5: Repeat and Maintain:
Remember, seasoning is not a one-time affair. Make it a habit to season your Weber smoker regularly, especially if it has been sitting idle for an extended period or if you spot any signs of rust. Regular seasoning not only prolongs the lifespan of your smoker but also intensifies the flavors of your smoked creations.
Is Seasoning Necessary for Weber Smokers?
As you get ready to embark on your smoking adventures, don’t overlook the crucial step of seasoning your smoker. While it may not be mandatory, experts highly recommend seasoning to enhance the performance and longevity of your Weber smoker.
Seasoning involves applying a coating of oil to the interior surfaces of your smoker. This creates a protective layer that prevents rust and seals any gaps or pores in the metal, keeping moisture out. Not only does seasoning protect your investment, but it also eliminates any manufacturing residues or odors that could affect the flavor of your food.
The benefits of seasoning don’t end there. By creating a non-stick surface, seasoning makes cleaning and maintaining your smoker a breeze. No more scrubbing away stubborn food particles or struggling with stuck-on grime.
To season your Weber smoker, start by preheating it to a high temperature. Use high smoke point oils like vegetable oil or canola oil to apply a thin layer to all interior surfaces. Make sure every nook and cranny gets coated. Then, let the oil bake at the high temperature for 1-2 hours. This process allows the oil to penetrate and bond with the metal, creating that essential protective layer.
Remember, seasoning is a one-time process and does not need to be repeated regularly. However, it’s wise to periodically inspect your smoker for signs of rust or wear and re-season if necessary.
Even if your Weber smoker comes pre-seasoned from the factory, it’s still advisable to season it again before use. This ensures optimal performance and gives you peace of mind knowing that your smoker is properly protected.
Maintaining the Flavor of Your Food with Seasoning
As you embark on your grilling adventures with your esteemed Weber smoker, never underestimate the power of seasoning. This secret ingredient holds the key to elevating your culinary creations to unprecedented heights, ensuring that each bite bursts with mouthwatering flavor and leaves your taste buds yearning for more. In this comprehensive guide, we will unveil the art of seasoning your Weber smoker, equipping you with the knowledge to unlock a symphony of flavors that will tantalize your senses.
Step 1: Prep and Cleanse – Laying the Foundation
Before delving into the enchanting process of seasoning, it is of utmost importance to grant your smoker a thorough cleanse. Armed with a bucket of warm soapy water, diligently scrub away any traces of dirt or debris that may have accumulated. Rinse it off meticulously, leaving no trace behind, and ensure that it is bone dry before proceeding to the next step.
Step 2: Oil Up – The Dance of Flavors Begins
Now, dear grill master, prepare yourself for the exhilarating part – oiling up. Take hold of your trusty brush or a delicate paper towel and gracefully apply a sublime layer of high-heat cooking oil, such as vegetable or canola oil, to the interior surfaces. Allow this ethereal coat of oil to weave its magic by not only safeguarding against dreaded rust but also coaxing out the full potential of flavors in every morsel.
Step 3: Fire It Up – Igniting the Culinary Symphony
With your Weber smoker now suitably anointed, it is time to ignite the fire. Envelop your senses in anticipation as you preheat your smoker to a temperature of approximately 400°F (200°C). Let it bask in its fiery splendor for a mesmerizing 30 minutes, allowing the oil to gracefully penetrate and form an unbreakable bond with the metal surfaces. During this enchanting process, do not be alarmed if wisps of smoke or a delicate scent caress your senses – for it is in these moments that the true magic unfolds.
Step 4: Cool Down and Reap the Rewards – Unveiling Seasoned Perfection
As the half-hour mark gracefully passes, allow your smoker to cool down naturally, surrendering to the gentle caress of time. Resist the temptation to employ water or abrasive cleaners during this period, as they have the power to undo all your diligent efforts. Once cooled, marvel at the seasoned beauty that now graces your Weber smoker – a vessel primed and ready to unleash its full flavorful potential.
Improving Temperature Regulation with Seasoning
Get ready to dive into the world of seasoning and discover how it can not only enhance the flavor of your food but also improve temperature regulation for a superior grilling experience.
Seasoning is more than just adding a sprinkle of flavor; it’s about creating a protective layer that ensures optimal temperature control and maintains a clean and safe cooking environment. But why is seasoning so important? When you first get your smoker or if it’s been sitting in storage, it may have accumulated moisture or dust. Seasoning helps eliminate any manufacturing residues or odors, giving you a fresh start for your grilling adventures.
To begin the seasoning process, make sure you have a high smoke point oil like vegetable or canola oil. These oils can withstand the high temperatures without producing harmful fumes or flavors. Before applying the oil, it’s crucial to give your smoker a good cleaning to remove any dirt or debris that could interfere with the process.
Now, let’s get down to business. Grab a cloth or brush and apply a thin coat of oil to all the interior surfaces, including the cooking grates. This step is crucial as it creates a protective layer that prevents rust and improves temperature regulation. Think of it as armor for your smoker, ensuring it performs at its best every time you fire it up.
With your smoker now oiled up, it’s time to fire it up. Preheat it to a moderate temperature of around 250°F (120°C) and let it run for about 2 hours. This allows the oil to penetrate and form that beautiful protective layer we’ve been talking about. During this process, keep a close eye on the temperature and make adjustments as needed to maintain a consistent heat level.
Once the recommended seasoning time has elapsed, turn off the smoker and let it cool down completely. When it’s cool, take a cloth and remove any excess oil or residue. You’re now ready to embark on a flavor-filled journey with your perfectly seasoned Weber smoker.
Remember, seasoning is not a one-time thing. It’s recommended to perform this process periodically, especially if you notice any signs of rust or deterioration on the interior surfaces. Regularly seasoning your Weber smoker will help maintain its performance, extend its lifespan, and ensure optimal temperature regulation for delicious grilled and smoked foods.
Porcelain Enamel Coating vs. Seasoning
These two options have the power to transform your grilling game and take it to new heights. In this in-depth analysis, we’ll compare and contrast the differences between porcelain enamel coating and seasoning, and help you understand why one might be better suited for your grilling needs.
Porcelain Enamel Coating: The Protective Shield
Let’s start with porcelain enamel coating, a smooth and glossy protective layer applied to the interior of Weber smokers. This coating acts as a guardian against rust and corrosion, ensuring the longevity of your smoker. But its benefits don’t end there. The non-stick properties of porcelain enamel make cleaning up after a cookout an absolute breeze. Say goodbye to those stubborn food residues that cling to the grates. With porcelain enamel, you’ll enjoy a hassle-free grilling experience.
Seasoning: The Flavorful Armor
Seasoning is the process of applying a layer of oil to the surface of your smoker. Not only does it enhance flavor, but it also creates a non-stick barrier between your food and the smoker’s surface, making grilling easier and cleanup a breeze. While seasoning is often associated with raw cast iron or steel smokers, it can still be beneficial for Weber smokers with porcelain enamel coating. By seasoning your Weber smoker, you’re not only adding a burst of flavor to your grilled delights but also improving the non-stick properties of the coating itself. It’s like giving your smoker an armor that enhances its performance and ensures nothing sticks to its surface.
The Process:
To season a Weber smoker with porcelain enamel coating, follow these steps:
- Thoroughly clean the smoker to remove any dirt or debris.
- Apply a thin layer of high smoke point oil like vegetable or canola oil to all interior surfaces, including the cooking grates.
- Preheat the smoker to approximately 250°F (120°C) and let it operate for about two hours to allow the oil to penetrate and create a protective layer.
- Once cooled, wipe away any excess oil or residue, and you’re ready to grill.
Personal Preference:
While the porcelain enamel coating provides some level of protection and non-stick properties, whether or not to season your Weber smoker is a personal preference. Some grillers may find the coating sufficient on its own, while others may choose to season for added benefits. It ultimately depends on your desired outcome and grilling style. Experiment with both options and discover what works best for you.
kpPZhKoF1GU” >
Conclusion
In conclusion, the resounding answer to the question “Do I need to season my Weber smoker?” is a definite yes. Seasoning your Weber smoker is an absolute must-do that will elevate your smoking experience and guarantee peak performance.
By seasoning your Weber smoker, you establish a protective shield that thwarts rust and corrosion, extending the lifespan of your prized equipment. Not only does it create a non-stick surface that simplifies post-grilling clean-up, but it also imparts a tantalizing smoky essence to your culinary creations, elevating them to new heights of deliciousness.
To embark on the seasoning process, begin by meticulously cleansing the interior surfaces. Then, with the finesse of an artist, apply a thin layer of suitable oil or fat using either a brush or cloth. As you preheat the smoker, allow the oil to permeate and bond with the metal for optimal results. Once cooled, gently wipe away any excess oil or residue.
While Weber smokers boast an initial porcelain enamel coating for protection, seasoning provides added advantages. It enhances temperature regulation and ensures even heat distribution—guaranteeing flawlessly cooked meals each time you fire up your smoker.
Remember that seasoning is not a one-and-done affair; it demands periodic repetition—particularly if signs of rust or deterioration rear their ugly heads.
So, do not dismiss this critical step in your smoking journey. Dedicate some time to season your beloved Weber smoker and unlock a realm of delectable smokiness that will keep you coming back for more.