Are you a true barbecue enthusiast who knows that a reliable smoker is the key to achieving mouth-watering results? If so, you’re likely familiar with Traeger smokers and their vital component, the hot rod. The hot rod serves as an ignition system that ignites wood pellets and kickstarts the fire your smoker needs to produce top-quality smoke.
As time passes, hot rods can become damaged or faulty, which means they need to be replaced. Although replacing the hot rod in your Traeger smoker may seem daunting at first glance, it’s actually a simple process that takes very little time. In this blog post, we’ll guide you through everything you need to know about changing your Traeger’s hot rod – from recognizing when it needs replacement to gathering the necessary tools for the job.
Whether you’re a seasoned pitmaster or new to grilling altogether, our step-by-step guide will give you all the confidence and knowledge required to keep your grill running smoothly. With a new hot rod in place, say goodbye to bland flavor and uneven smoke – your Traeger smoker will be back in action producing exceptional barbecue in no time.
Contents
What is a Traeger Hot Rod?
The Traeger Hot Rod is a vital component that ignites the pellets and maintains the desired temperature within the grill. It is located inside the firepot and is often referred to as the igniter rod.
Made of sturdy materials like ceramic and steel, Traeger Hot Rods are designed to withstand high temperatures and frequent use, ensuring long-lasting performance. However, constant wear and tear can cause them to wear out over time, requiring replacements. In such cases, it’s essential to replace the hot rod to ensure optimal grill performance.
It’s important to note that Traeger Hot Rods are specific to Traeger grills and cannot be substituted with other brands. Using a non-Traeger hot rod can damage the grill and void any warranty, so it’s best to stick with the original component.
When replacing a hot rod in your Traeger grill, ensure that you have a few essential tools and some basic knowledge of the grill’s components. Begin by unplugging and cooling the grill before working on it. Locate the hot rod, which protrudes from the bottom of the firepot.
To remove the old hot rod, use a wrench or pliers to loosen the nut that secures it in place. Pull out the hot rod from the firepot without damaging other parts of the grill. Next, insert the new hot rod into the firepot, aligning it correctly with other components of the grill.
Finally, tighten the nut securely using a wrench or pliers before plugging in your Traeger grill for a test run. If everything is correctly installed, you should notice faster heating and more even cooking.
Preparing to Change the Hot Rod
Before diving in, it’s important to prepare yourself and your grill for the task at hand. Let’s walk through some essential steps to get started:
First and foremost, prioritize safety by turning off and unplugging your grill. Don’t skip this crucial step. Next, remove the grates and drip tray according to your owner’s manual. This will provide access to the hot rod.
Now, gather your tools. Be sure to have a screwdriver, pliers, and a wrench on hand before starting. These essential tools will make the process smoother.
Don’t forget to order a replacement hot rod before beginning the replacement process. You don’t want to be caught mid-task without a crucial piece.
Lastly, allow your grill to cool down completely before replacing the hot rod. This critical step will prevent any burns or injuries while making the upgrade.
Removing the Old Hot Rod
Upgrading the hot rod is a crucial step in achieving perfectly cooked meals that will make your taste buds dance. But before you can install the new hot rod, you must first remove the old one. Don’t worry; with some patience and proper tools, you’ll have it removed in no time.
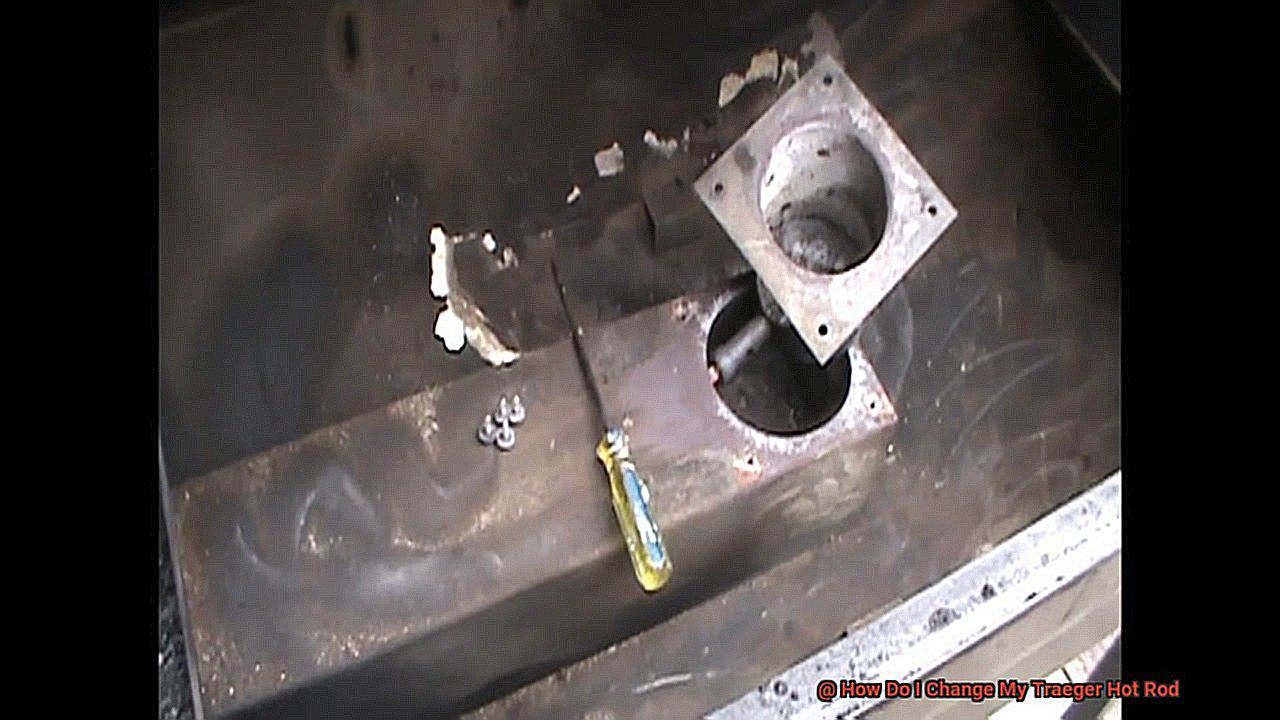
First and foremost, safety always comes first. Disconnect your grill from the power source before proceeding. Once that’s done, locate the hot rod assembly. Generally, it can be found near the firepot at the bottom of the grill.
Now it’s time to unscrew the old hot rod from its housing. This might require a Phillips head screwdriver or wrench, depending on your Traeger model. Be careful not to damage any surrounding components or wiring while doing so.
Once you’ve removed all screws, gently pull out the old hot rod from its housing. Remember how it was positioned so that you can install the new hot rod correctly later.
Before moving on to installing the new hot rod, take a moment to inspect the surrounding components for any signs of wear or damage. It’s best to address any issues before installing the new hot rod to ensure optimal performance.
Inserting the New Hot Rod
As a Traeger grill aficionado, you understand the importance of having a perfectly functioning hot rod to achieve incredible meals. Whether you’re upgrading your hot rod or replacing a faulty one, knowing how to insert the new hot rod is critical. Fear not, it’s not complicated. In this post, we’ll guide you through the process step by step to make it as easy as possible.
Before you get started, make sure you have the correct replacement hot rod for your specific Traeger grill model. Once you have the replacement, turn off and unplug your grill and let it cool down before starting the replacement process.
Step One: Locate the Hot Rod
The hot rod is typically situated near the bottom of the firepot. You may need to remove the grates and drip tray to access it.
Step Two: Remove the Old Hot Rod
Using a wrench or pliers, carefully unscrew the old hot rod from its housing. Take note of its orientation as you remove it to ensure that you can insert the replacement correctly.
Step Three: Insert the New Hot Rod
Now comes the moment of truth. Take your new replacement hot rod and insert it into the same housing. It’s crucial to make sure that it’s oriented correctly and securely tightened with a wrench or pliers.
Step Four: Test the New Hot Rod
Congratulations. You’ve successfully inserted your new hot rod. Plug in your Traeger grill and turn it on to test the functionality of the new hot rod. If everything’s working correctly, get ready for some deliciously cooked meals.
Securing the New Hot Rod in Place
This small but mighty component is responsible for igniting the pellets and starting the fire in your grill. That’s why securing the new hot rod in place is a critical step when changing your Traeger hot rod.
To ensure that everything goes smoothly, start by prioritizing safety. Before beginning the replacement process, turn off and unplug your grill to avoid any electrical shocks or burns.
Now it’s time to remove the old hot rod from the grill. Unscrew the bolts or screws holding it in place and keep them in a safe place as you’ll need them later to secure the new hot rod. With the old hot rod out of the way, it’s time to slide in the new one into the same position as the old one. Make sure that it fits snugly into place and that there are no gaps or spaces between the hot rod and the grill.
When securing the new hot rod, be sure not to overtighten the screws or bolts, as this could damage either the hot rod or the grill. Carefully screw each bolt or screw in place to ensure that everything is securely fastened.
Finally, plug in your Traeger grill and turn it on to test your new hot rod. If everything is working correctly, you should see sparks coming from the hot rod as it ignites the pellets and starts your grill.
In summary, here are some key takeaways to remember when securing your new hot rod:
- Prioritize safety by turning off and unplugging your grill before starting.
- Keep screws and bolts from removing the old hot rod in a safe place for later use.
- Slide in the new hot rod carefully, ensuring a snug fit with no gaps.
- Be careful not to overtighten screws or bolts when securing the new hot rod.
- Test your new hot rod by plugging in and turning on your Traeger grill.
Testing Out Your Grill After Replacing the Hot Rod
Now, before you start cooking up a storm, it’s important to test out your grill and make sure everything is in tip-top shape. Trust us, you don’t want to end up with undercooked or burnt food because of a malfunctioning grill.
Here are the steps to follow when testing out your grill after replacing the hot rod:
- Step 1: Start by turning on your Traeger grill and setting the temperature to 350°F. Allow it to heat up for about 15-20 minutes, giving it time to stabilize and ensure that the new hot rod is working properly.
- Step 2: Once the desired temperature is reached, grab an oven thermometer and place it on the grill grates. This will provide you with an accurate reading of the temperature inside the grill.
- Step 3: Check the temperature in different areas of the grill to ensure that it’s consistent throughout. It’s crucial to have an even distribution of heat across the grill to prevent any over or undercooking.
- Step 4: If everything looks good, you’re ready to cook. However, if you notice any issues with the temperature or heating, it may be necessary to troubleshoot the problem or contact customer support for assistance.
Benefits of Changing Your Traeger Hot Rod Regularly
It’s a culinary game-changer that infuses rich, smoky flavors into every dish, making each meal an unforgettable experience. However, did you know that a simple maintenance task like changing your Traeger hot rod regularly can make a significant difference in the performance of your grill? Let’s explore the benefits of this maintenance task.
First and foremost, replacing your Traeger hot rod ensures consistent ignition and temperature control. The hot rod is responsible for igniting the pellets that create heat and smoke for cooking. If it’s not functioning correctly, you may experience uneven heating and unexpected shut-offs during the cooking process. By changing your hot rod regularly, you can prevent these issues from occurring and ensure that your food is cooked evenly every time.
In addition to consistent ignition and temperature control, a worn-out hot rod can cause strain on other components of the grill, leading to further damage and costly repairs. By replacing the hot rod regularly, you can prevent these issues from occurring and keep your grill running smoothly for years to come.
Beyond ensuring proper function and longevity of your grill, changing your Traeger hot rod can significantly improve the flavor of your food. A faulty hot rod can lead to incomplete combustion of the pellets, resulting in less smoke and flavor being produced. By replacing the hot rod regularly, you can ensure that your food is infused with the rich, smoky flavor that Traeger grills are known for.
To summarize, changing your Traeger hot rod regularly is a simple maintenance task with significant benefits. Here are some key takeaways:
- Consistent ignition and temperature control
- Longevity of your grill
- Improved flavor of your food
Troubleshooting Common Problems with Your Traeger Grill
Don’t let these issues dampen your BBQ spirit. Rest assured, most of the common problems can be resolved through simple troubleshooting and replacement of faulty parts. Let’s delve into the most prevalent issue Traeger grill owners face – a malfunctioning hot rod.
The hot rod is a crucial component of your grill that ignites the pellets to create heat for cooking. If your hot rod is not working correctly, your grill will not produce enough heat to cook food properly. This could be due to several reasons such as a damaged hot rod, faulty wiring, or simply a buildup of ash and debris on the hot rod.
To troubleshoot this issue, start by checking the wiring connections between the hot rod and the controller. Ensure they are tight and secure. If the wiring appears intact, remove the hot rod from the grill and inspect it for any signs of damage or wear. If it looks damaged, you will need to replace it. Here’s how:
- Turn off and unplug your Traeger grill before starting any repair work.
- Remove the grates and grease tray from the grill to access the firepot.
- Use a pair of pliers to carefully remove the old hot rod from its housing.
- Install the new hot rod in its place, making sure it is properly secured.
- Reattach any wiring connections that were removed during the process.
- Replace the grates and grease tray before starting up your grill again.
Besides issues with the hot rod, other common problems with Traeger grills include poor temperature control, uneven heating, and pellet jams. However, most of these issues can also be resolved through simple troubleshooting and replacement of faulty parts as needed.
eXynkEv0vjY” >
Conclusion
To sum up, changing your Traeger smoker’s hot rod is a straightforward process that can significantly enhance your grill’s performance. The hot rod plays a crucial role in igniting wood pellets and jumpstarting the fire necessary for producing high-quality smoke. Over time, hot rods can wear out or become damaged, leading to uneven heating and unexpected shutdowns during cooking. Regularly replacing the hot rod can prevent these issues and ensure consistently even cooking.
Before beginning the replacement process, it’s essential to prioritize safety and gather the necessary tools like screwdrivers, pliers, and wrenches. You’ll also need to order a replacement hot rod ahead of time. Properly removing the old hot rod and inserting the new one is critical to ensure correct installation.
Finally, testing your grill after replacing the hot rod is crucial for consistent ignition and temperature control while improving food flavor. If you encounter common problems with your Traeger grill, such as poor temperature control or pellet jams, troubleshooting and replacing faulty parts are often simple solutions.