Are you tired of being uncertain about the origin and quality of the ground meat you purchase from the store? Do you want to take charge of the type and texture of your meat? Look no further than setting up a meat mincer. This simple solution allows you to create perfectly ground meat right in your own home. Not only does it ensure freshness and safety, but it also gives you the freedom to experiment with different cuts and mixtures to create unique flavors.
But, let’s be honest, setting up a meat mincer can seem like an intimidating task for beginners. With so many components and types of machines available, it’s easy to feel overwhelmed. Don’t fret. In this blog post, we’ll guide you through the essential steps of setting up a meat mincer. From preparing the machine and selecting the right cut of meat, to assembling the parts and maintaining your equipment – we’ve got you covered.
By following our tips, you’ll be grinding like a pro in no time. Say goodbye to uncertainty about your meat and hello to confidence in its safety and flavor. Let’s dive in together and take control of your meat grinding needs.
Contents
What is a Meat Mincer?
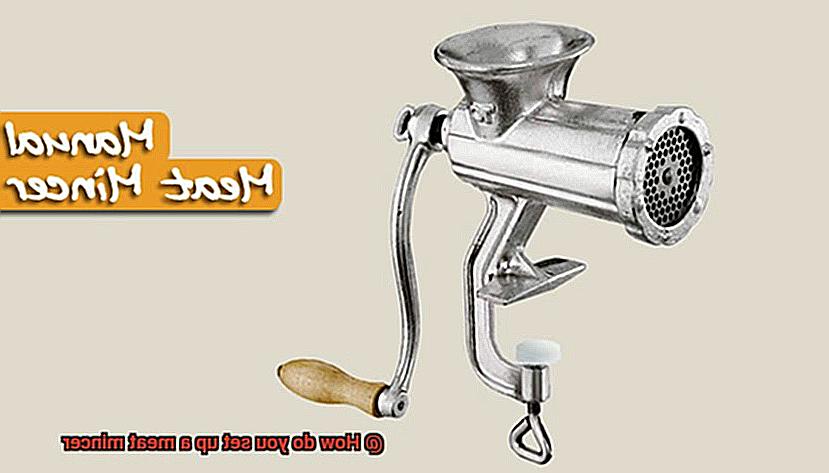
A meat mincer is a versatile kitchen appliance that can transform any cut of meat into smaller pieces, perfect for making burgers, sausages, meatballs, and more.
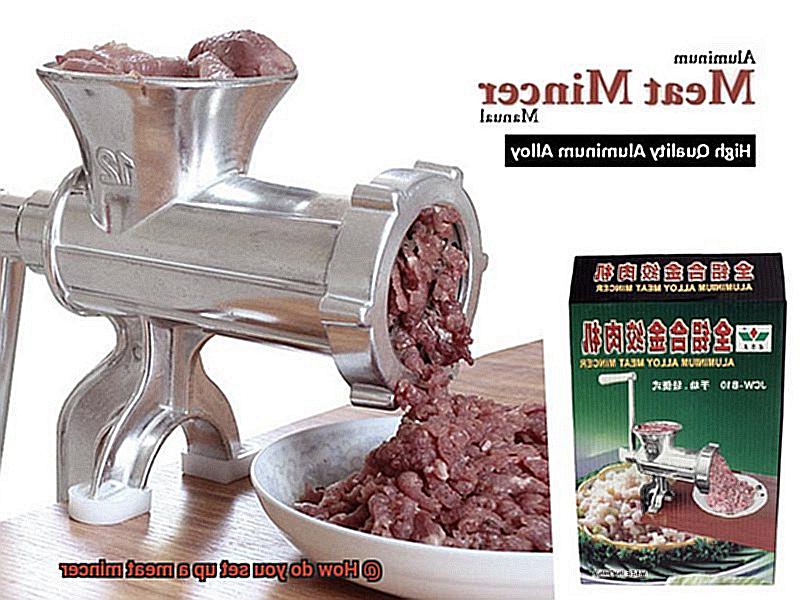
Meat mincers come in two main types: manual and electric. Manual meat mincers are perfect for occasional use or small quantities of meat. They are operated by hand and are usually smaller in size and less powerful. In contrast, electric meat mincers are designed for frequent use or grinding large quantities of meat quickly and efficiently. They are larger and more powerful than manual ones.

When it comes to choosing a meat mincer, it is crucial to consider factors such as the amount of meat you need to grind, the frequency of use, and your budget. Fortunately, there are different sizes and capacities available for home or commercial use.
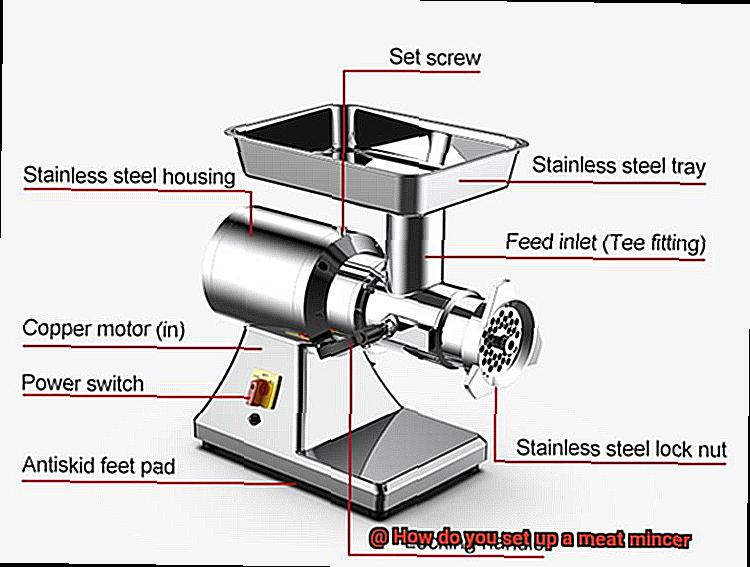
Assembling a meat mincer is relatively easy. The necessary parts include the main body, blades, hopper, and plunger. By attaching the blades to the main body of the meat mincer and then adding the hopper to the top of the blades in the correct order, you can ensure all parts are securely attached. This is necessary to prevent accidents or injuries during use.
Before using the meat mincer, it’s important to clean all parts thoroughly with warm water and soap. This ensures that the meat mincer is hygienic and prolongs its lifespan.
Once cleaned, it’s time to test your new kitchen gadget by grinding a small amount of meat before using it on a larger scale. This helps ensure everything is working correctly and allows for necessary adjustments.
Necessary Parts for Setting Up a Meat Mincer
Here, we’ll be discussing the essential parts needed for setting up a meat mincer.
First and foremost, you’ll need the meat mincer itself. Don’t rush to buy the first one you see. Take your time and choose a model that fits your needs and budget. There are various sizes and models available, so make sure to do your research before making a purchase.
Next up is the blade. This small but mighty part is responsible for cutting the meat into small pieces, so it’s crucial that it’s sharp and in good condition. Some meat mincers come with multiple blades for different types of meat or for varying textures.
The hopper is another critical component of your setup. It’s where you’ll feed the meat into the machine. The size of the hopper will depend on the size of the meat mincer, but make sure it can hold enough meat without overflowing.
To guide the meat down into the hopper and towards the blade, you’ll need a plunger or pusher. This is especially important when working with tougher cuts of meat that may require more force to push through the machine. Don’t risk injuring yourself by using your hands.
Finally, as the ground meat comes out of the machine, you’ll need something to catch it. A simple plastic container will do, but consider investing in a specialized tray designed specifically for use with meat mincers. It will make cleaning up a breeze.
Assembling the Parts of the Meat Mincer
Assembling a meat mincer might sound like a daunting task, but with just a little bit of guidance, you’ll be well on your way to creating perfectly minced meat in no time.
Firstly, ensure that you have all the necessary parts for your meat mincer. This typically includes the grinder body, auger, blade, plate, and pusher. Once you have everything you need, choose a sturdy surface and attach the grinder body using the clamp provided.
Next, insert the auger into the body and place the blade on top of it. Make sure that the blade is sharp and securely attached to the auger to ensure efficient grinding.
Now it’s time to select the plate size for grinding your meat. The size of the plate determines the texture of your meat after grinding. For coarse ground meat, opt for a larger plate with bigger holes. For finer ground meat, use a smaller plate with smaller holes. Attach the chosen plate to the grinder body.
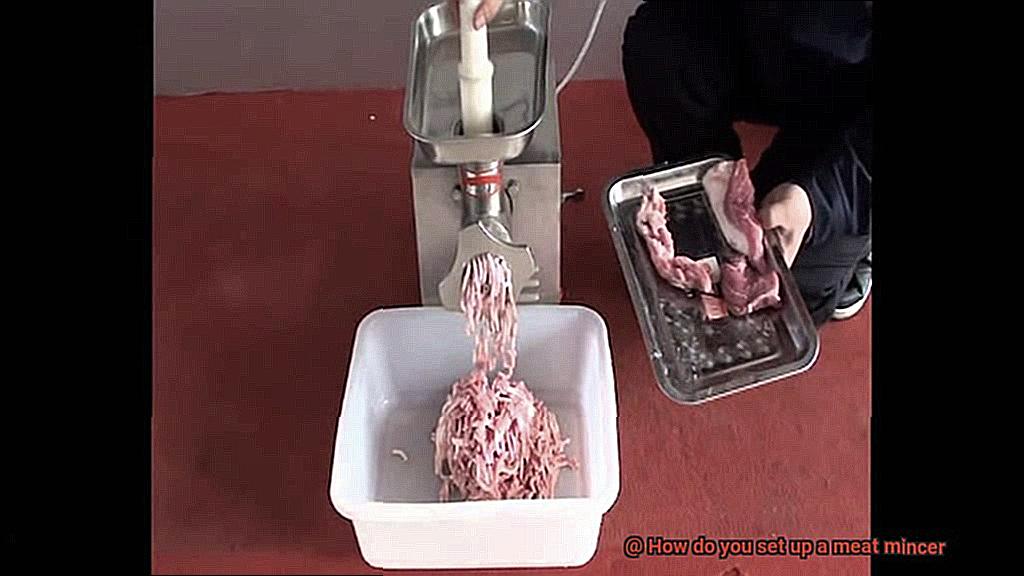
With all the parts in place, it’s time to test out your meat mincer. Plug it in and turn it on. Using the hopper, feed small pieces of meat into the grinder while using the pusher to push them down into the auger. Ensure that you keep your hands away from the hopper at all times and never force meat through if it gets stuck.
To catch your freshly minced meat, keep a container underneath the grinder. Congratulations. You’ve successfully assembled and used your new meat mincer.
Cleaning the Meat Mincer Before Use
Before you get started, it’s essential to ensure that your machine is clean and free from any contamination from previous use. Not only will this prevent bacteria and germs from entering your food, but it will also keep your machine in good condition for a long time. As an expert on this topic, I have compiled some crucial steps to guide you through the process of cleaning your meat mincer before use.
Step 1: Unplug and Prepare
Safety always comes first. Before cleaning your meat mincer, make sure to unplug it from the power source. Next, remove any leftover meat or food particles from the machine’s blades and hopper using a soft-bristled brush or toothbrush. This will ensure that there are no remnants left inside the machine that could cause contamination.
Step 2: Disassemble
Now that the visible debris is removed, it’s time to disassemble the different parts of the meat mincer. Refer to your user manual to know which parts are detachable. Once you have identified them, remove each part and wash them with warm soapy water. Rinse each part thoroughly under running water to ensure there is no soap residue left behind.
Step 3: Dry and Reassemble
After washing each part, it’s essential to let them dry completely before reassembling them. You can wipe each part dry with a clean cloth or paper towel. Once everything is dry, reassemble the meat mincer by attaching the blades to the auger and placing it back into the machine’s housing. Secure the hopper by locking it in place and attach any additional accessories such as sausage stuffing tubes.
Testing the Meat Mincer Before Use
If you’re getting ready to use your meat mincer for the first time, it’s important to take a few minutes to test the machine before jumping into grinding meat. As an expert on meat mincers, I can’t stress enough the importance of ensuring that your equipment is functioning correctly. Not only will this save you time and frustration, but it will also ensure that you produce quality results.
To start, check all the components of your meat mincer, including the blades, plates, and feeding tray. Make sure they are all clean and free from debris or damage. When you’re ready to test your machine, plug it in and switch it on. Listen for any unusual noises or vibrations coming from the motor, which should run smoothly if everything is in working order.

Next, feed a small piece of meat through the feeding tray and observe how the mincer performs. This step is crucial in determining whether your machine is grinding meat evenly and producing your desired texture. If you notice any issues like uneven grinding or clogging of the mincer, stop it immediately and identify and fix the problem before proceeding with larger quantities.
It’s also important to remember that testing your meat mincer before use is not just about ensuring quality results. Safety should always be a top priority when using any kitchen equipment, especially a powerful tool like a meat mincer. Always take necessary precautions when using a meat mincer, such as wearing protective gear like gloves and goggles.
Tips for Operating a Meat Mincer Safely and Efficiently
Operating a meat mincer can be a great way to create your own ground meat at home, but it’s important to do so safely and efficiently. Here are some tips to help you get the best results:
Wear Protective Gear
Always wear gloves, safety goggles, and an apron when using a meat mincer. This will protect you from any potential injury or contamination.
Keep the Machine Clean
It’s crucial to keep the machine clean before and after every use. This will prevent bacteria build-up and ensure that the machine operates efficiently.
Use the Right Blade
Using the appropriate blade for the type of meat you are grinding is essential for even and efficient grinding. Make sure to select the right size of the cutting plate for your desired output – a smaller cutting plate will produce finer ground meat, while a larger one will create coarser meat.
Cut Meat into Small Pieces
Before feeding the meat into the mincer, make sure to cut it into small pieces. This will make it easier for the machine to grind the meat and reduce the risk of clogging.
Don’t Overload the Machine
Overloading the machine can cause it to jam or break down. To avoid this, only put small amounts of meat into the mincer at a time.
Never Force Meat Through
If you find that the meat is not being ground properly, don’t force it through the machine. Instead, stop the machine and check for any blockages or issues.
To minimize mess when using a meat mincer, place a bowl or tray underneath the machine to catch the ground meat as it comes out. Additionally, cleaning the machine immediately after use will make it easier to maintain and prevent any build-up of bacteria or debris.
Common Issues When Using a Meat Mincer
Perhaps you want to know what goes into your food or save money by grinding your own meat at home using a meat mincer. While this can be a cost-effective and fun way to create delicious meals, some common issues can arise that may affect the quality of your meat. As an expert on this topic, I will share some valuable tips to help you avoid these problems and ensure that your meat mincing experience is a success.
One of the most common issues when using a meat mincer is clogging. This occurs when the meat being fed into the machine is too large or contains too much fat. To avoid clogging, it’s essential to cut the meat into smaller pieces and remove any excess fat before feeding it into the machine. You may also need to adjust the settings on your machine to fit the type of meat you are using.
Another issue that can occur when using a meat mincer is dull blades. Over time, the blades on your machine may become dull or damaged, affecting the quality of the minced meat produced. To avoid this issue, always sharpen or replace the blades on your machine regularly.
Safety is also paramount when using a meat mincer. Follow all safety guidelines provided by the manufacturer and secure the machine to a stable surface before use. Additionally, never use your hands to feed the meat into the machine – always use a pusher or plunger.
In summary, to ensure that your meat mincing experience is efficient, safe, and enjoyable, keep these tips in mind:
- Cut your meat into smaller pieces and remove excess fat before feeding it into the machine to avoid clogging.
- Regularly sharpen or replace blades on your machine to ensure consistent, high-quality minced meat.
- Always follow safety guidelines provided by the manufacturer and use a pusher or plunger instead of your hands when feeding meat into the machine.
-DtFFVVJBtc” >
Conclusion
In summary, a meat mincer is a must-have for anyone who wants to take control of the quality and origin of their ground meat. With this versatile kitchen appliance, you can create perfectly minced meat with unique flavors and textures right in your own home. However, setting up a meat mincer may seem intimidating for beginners with so many components and types of machines available. But fear not. With our expert guidance, you’ll be grinding like a pro in no time.
To set up your meat mincer, you will need essential parts such as the grinder body, blades, hopper, plunger and tray. Assembling these parts is relatively easy once you have identified them and cleaned them thoroughly before use.
But safety comes first when operating a meat mincer. It’s crucial to wear protective gear such as gloves and safety goggles to avoid any accidents. Keep the machine clean before and after every use to prevent bacteria build-up and ensure efficient operation. Always use the appropriate blade size for the type of meat you are grinding; cutting the meat into small pieces before feeding it into the machine will help avoid clogging or overloading it.
By following these tips on how to set up a meat mincer at home safely and efficiently, you’ll be able to enjoy high-quality minced meat with unique flavors that suit your taste buds.