Are you tired of overcooking or undercooking your meat on the grill? Fear not. The Traeger grill’s meat probe is here to save the day and elevate your outdoor cooking game.
Traeger grills are renowned for their wood-fired flavor and user-friendliness, but their meat probe takes things up a notch. This attachment allows you to monitor the internal temperature of your meat, ensuring that it reaches the perfect level of doneness. From juicy smoked brisket to succulent grilled chicken, the Traeger meat probe takes all the guesswork out of outdoor cooking.
In this post, we’ll delve into the nitty-gritty details of using the meat probe on a Traeger grill. We’ll cover everything from attaching the probe to your grill to inserting it into your meat and setting the desired temperature. Plus, we’ll discuss how to read the temperature on your grill’s digital display and what to do once your meat has reached its ideal temperature.
Whether you’re a novice or seasoned outdoor cook, using a Traeger’s meat probe will help you achieve mouthwatering results every time. So go ahead, fire up that Traeger and let’s master the art of meat temperature monitoring together.
Contents
Benefits of Using a Meat Probe on a Traeger Grill
When it comes to grilling, achieving perfectly cooked meals can be a challenge. However, Traeger grills offer a solution in the form of a meat probe. This handy tool allows you to monitor the internal temperature of your meat in real-time, ensuring that it’s cooked to perfection. In this article, we’ll explore the numerous benefits of using a meat probe on a Traeger grill.
Accurate Temperature Monitoring
One of the most significant advantages of using a meat probe is the ability to accurately measure the internal temperature of your meat. This ensures that you don’t undercook or overcook your food, which can be a common problem when grilling. The meat probe on a Traeger grill allows you to monitor the temperature of your meat without having to open the lid, which can cause heat loss and result in uneven cooking.
Prevents Foodborne Illnesses
Another advantage of using a meat probe on a Traeger grill is that it helps to prevent foodborne illnesses. By ensuring that your meat is cooked to the appropriate temperature, you can eliminate harmful bacteria and other pathogens that may be present in undercooked meat. This is especially important for meats like chicken and pork, which can be sources of salmonella and other dangerous bacteria if not cooked properly.
Saves Time and Effort
Using a meat probe on a Traeger grill can also save you time and effort. Instead of constantly checking on your food to see if it’s done, you can rely on the meat probe to give you an accurate reading of the internal temperature. This means that you can spend more time socializing with your guests and less time babysitting your grill.
How to Use a Meat Probe on Your Traeger Grill
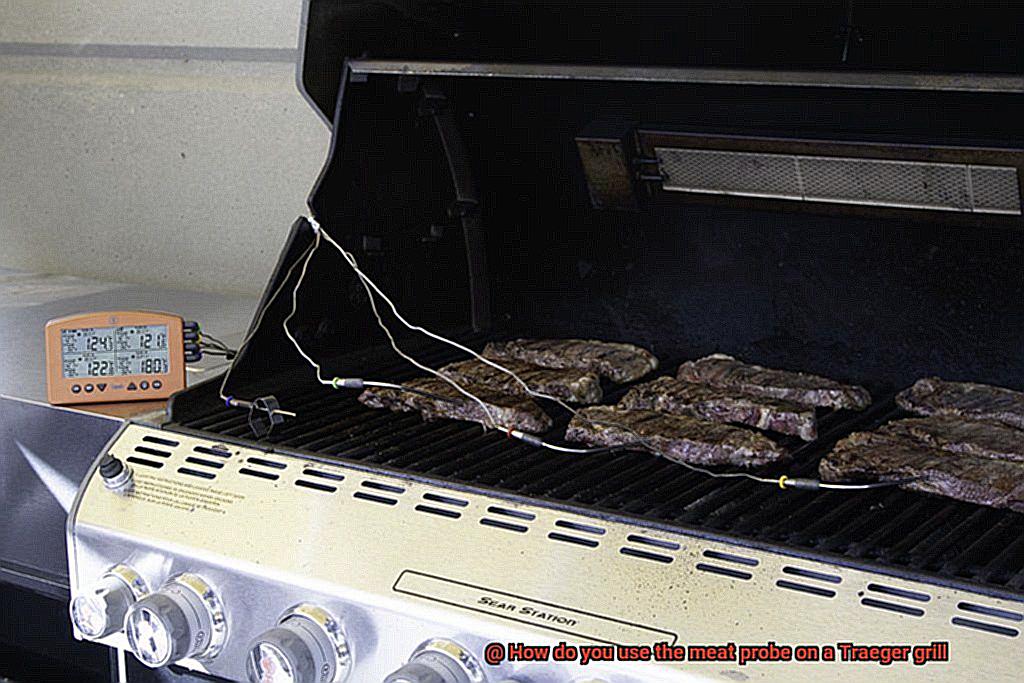
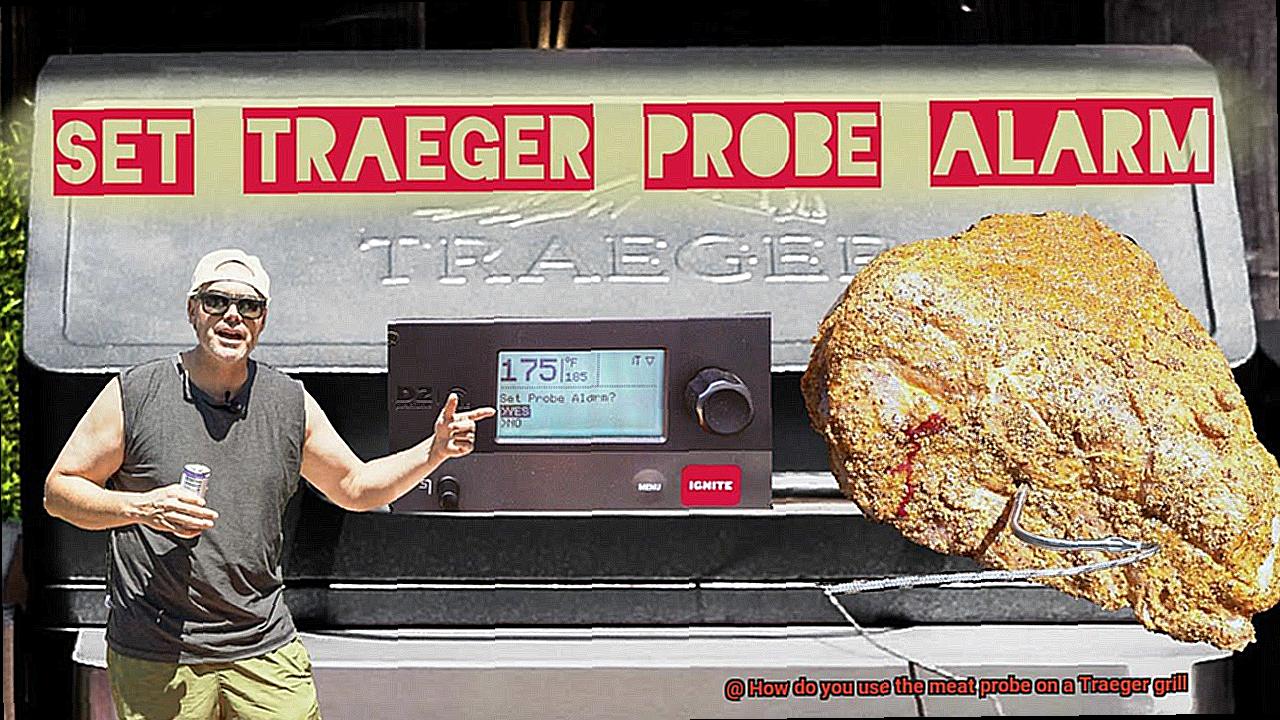
To use a meat probe on your Traeger grill, start by calibrating it according to the manufacturer’s instructions. Once calibrated, insert the probe into the thickest part of the meat, making sure it’s not touching any bones or fat. The other end of the probe should be plugged into the designated port on your Traeger grill. The controller will display both the current temperature and the desired temperature that you’ve set. You can also set alarms on your grill to alert you when your meat has reached a certain temperature.
Calibrating the Meat Probe
Grilling is an art, and the Traeger grill is a masterpiece that can turn you into a culinary wizard. The secret sauce to achieving perfectly cooked meat every time lies in calibrating your meat probe. In this post, we’ll guide you through the process of calibrating the meat probe on your Traeger grill.
Calibration is the process of adjusting the temperature readings of the probe to accurately reflect the internal temperature of the meat. Although Traeger grills come with pre-calibrated probes, it’s always prudent to double-check their accuracy before use.
To calibrate your meat probe, all you need is a cup of ice water and a thermometer. Fill up your cup with ice and add enough water to cover it. Insert the probe into the ice water, ensuring that it doesn’t touch any sides or bottom of the cup. Wait for around 30 seconds for the temperature reading to stabilize.
The temperature reading should be 32°F (0°C), which is the freezing point of water. If the reading is off by more than a degree or two, it’s time to adjust it. To do this, locate the calibration button on your Traeger grill controller. Press and hold the button until it displays “CAL,” then release it. The controller will start flashing “000” on its screen.
Using your thermometer as a reference, enter the correct temperature by pressing the up or down arrow buttons on your controller until you reach the desired temperature. Once you’ve entered the correct temperature, press the calibration button again to save it. The display will show “END,” indicating that calibration is complete.
It’s worth noting that you should calibrate your meat probe every time you use it, especially if you drop it or accidentally expose it to high temperatures. Calibration guarantees that your food is cooked safely and properly and helps prevent overcooked or undercooked meals.
In conclusion, calibrating your meat probe on your Traeger grill is a simple but crucial step to ensure that your food is cooked to perfection. By following the steps outlined above, you can enjoy perfectly cooked meals every time. Remember, calibration is key to unlocking your grill’s full potential. Happy grilling.
Inserting the Meat Probe into the Thickest Part of the Meat
Then it’s time to master the art of inserting the meat probe into the thickest part of the meat. This is the secret to achieving perfectly cooked meat every time.
Firstly, make sure that your meat is seasoned and ready to be placed on the grill. Now, it’s time to insert the meat probe into the thickest part of the meat. The reason for this is simple: the thickest part of the meat takes the longest to cook, making it essential for getting an accurate reading of its internal temperature.
To ensure an accurate reading, be sure to insert the meat probe securely, avoiding any bones or fat. Not doing so can result in an incorrect temperature reading, which could lead to overcooked or undercooked meat. It’s also essential to insert the meat probe at a slight angle, ensuring it doesn’t touch any bones as this too can cause false readings.
Once you’ve securely placed your meat probe, close the grill lid and let your Traeger work its magic. Your grill will adjust its temperature based on your desired internal temperature setting. When your meat reaches that ideal internal temperature, your Traeger grill will alert you with a beep or automatically lower the temperature to keep your meal warm until it’s time to serve.
Here are some additional tips for inserting the meat probe into the thickest part of the meat:
- Use a digital thermometer with a thin probe for accurate readings.
- Insert the probe into the center of the thickest part of the meat for best results.
- Always clean and sanitize your meat probe before and after use.
By following these tips and inserting the meat probe into the thickest part of your meat, you’ll achieve perfectly cooked meals every time. So, say goodbye to undercooked or overcooked meats and hello to impressing your friends and family with delicious grilled meals.
Plugging in the Other End of the Probe to the Traeger Grill
It all starts with plugging in the other end of the probe to your Traeger grill. This simple step can make a world of difference in achieving perfectly cooked meats every time.
First and foremost, safety is key. Make sure your grill is turned off and cool to the touch before proceeding. Once you’ve confirmed this, it’s time to locate the port on your Traeger grill where the probe is meant to be inserted. Depending on the model, this could be a designated port or require an accessory attachment.
Once you’ve found the right port, it’s time to insert the probe. Push it in until it clicks into place, ensuring that it’s securely attached to the grill. This will ensure that you get accurate readings throughout the cooking process.
Now for the fun part: turn on your Traeger grill and select your desired temperature setting. The best part? Your Traeger grill will automatically recognize that a meat probe has been inserted and will display the internal temperature of your meat on its digital display. It’s like having a personal chef right in your backyard.
But don’t sit back and relax just yet – regularly monitoring your meat’s internal temperature is crucial for achieving perfect results. Use the Traeger grill’s built-in probe to periodically check on your meat’s progress and ensure that it’s cooked to your desired level of doneness.
To sum it up, here are the steps:
- Confirm that your grill is turned off and cool to the touch.
- Locate the port on your Traeger grill where the probe is meant to be inserted.
- Insert the probe until it clicks into place, ensuring that it’s securely attached.
- Turn on your Traeger grill and select your desired temperature setting.
- Regularly monitor your meat’s internal temperature using the Traeger grill’s built-in probe.
Monitoring Temperature Readings with the Controller
Using the meat probe is a breeze. Simply plug it into the designated port on the controller and insert it into the thickest part of your meat. With a real-time display of both your set temperature and the internal temperature of your meat, you can ensure that your food is cooking to perfection without ever having to open the grill lid and lose heat.
But there’s more to the Traeger grill controller than just monitoring temperature readings. You can also adjust cooking times and temperatures as needed, making it a versatile tool for achieving optimal results with any cut of meat. Plus, with a meat temperature chart for guidance on safe internal temperatures, you can cook with confidence knowing that your food is both delicious and safe to eat.
Setting Alarms on Your Grill
Then it’s time to set alarms on your Traeger grill. As an expert on this subject, I’m here to guide you through the simple steps to ensure that you never overcook or undercook your meats again.
The key to using alarms effectively is to properly insert the meat probe into your meat. This ensures that you get accurate readings of your meat’s internal temperature. Once you’ve done that, turn on your Traeger grill and select the desired temperature setting for your meat.
Now it’s time to set those alarms. Navigate to the “settings” menu on your Traeger grill and select “probe.” Here, you can set the desired internal temperature for your meat. Once you’ve done that, select “done” to save your settings.
But wait, there’s more. You also have the option to set an alarm for when your meat reaches the desired temperature. Simply navigate back to the “probe” menu and select “alarm.” From here, you can choose to set an alarm based on either the internal temperature of your meat or based on time.
If you choose to set an alarm based on internal temperature, input the desired temperature and select “done” to save your settings. If you choose to set an alarm based on time, input how long you want your meat to cook for and select “done” to save your settings.
And just like that, your Traeger grill will notify you when your meat has reached the desired internal temperature or when it has cooked for the specified amount of time. No more guesswork involved in grilling.
Visual Inspection of Cooked Meats
As grill masters, we know that properly cooked meat is a must-have when it comes to serving up delicious meals. However, before you dive into using a meat probe on your Traeger grill, it’s crucial to visually inspect your cooked meats to ensure they’re safe to eat.
When cooking beef, pork, or poultry, pay attention to certain visual indicators of doneness. For beef, look for a brown or grayish-brown interior with no pink or red spots. Pork should be light pink with no traces of blood, while poultry should be white with no pink or red spots. Keep in mind that not all meats will have the same visual indicators of doneness – certain types of fish may appear translucent when fully cooked, and some types of red meat may remain slightly pink.
To be sure you’re cooking your meats to the correct temperature, always consult a reliable source for specific visual indicators of doneness. While visual inspection is an essential step in food safety, it’s not always enough. That’s where a meat probe on your Traeger grill comes in handy. By accurately measuring the internal temperature of your meat, you can guarantee that it has reached a safe temperature for consumption.
Here are some key takeaways to keep in mind:
- Visually inspect your cooked meats before using the meat probe
- Look for specific visual indicators of doneness for each type of meat
- Consult a reliable source for accurate information on visual indicators of doneness
- Always use a meat probe to ensure your food is fully cooked and safe to eat
Cleaning and Storing Your Meat Probe After Use
As a grill master, you know that perfectly cooked meat is the highlight of any BBQ party. But, have you ever thought about how to properly take care of your meat probe? Don’t worry; we’ve got you covered.
The first step in ensuring the longevity of your meat probe is to detach it from the grill and remove any excess food or debris from the tip. A damp cloth or paper towel will do the trick. However, avoid using any harsh chemicals or abrasive materials that could damage the probe.
Once cleaned, sanitize the probe by wiping it down with a solution of warm water and mild dish soap. Rinse thoroughly with clean water and dry it off completely with a clean towel before storing it away.
When storing your meat probe, make sure it’s completely dry and kept in a safe, cool, and dry place. Avoid direct sunlight and any heat sources that could damage the probe over time. A few tips to keep in mind while storing your meat probe after use are:
- Store in its proper storage container or casing
- Store in a place where children or pets can’t reach
- Ensure that it doesn’t come into contact with any other sharp objects
Ensure that you regularly check your meat probe for any signs of wear and tear or damage. If you notice any cracks or breaks in the wire or probe, it’s best to replace it immediately to ensure accurate and safe readings during your next grilling session.
tYvExTn6MS4″ >
Also Read: How to Use a Remote Probe Thermometer for Traeger Grill
Conclusion
In conclusion, the meat probe is a must-have tool for any Traeger grill enthusiast. By using this device, you can achieve perfectly cooked meats every time with ease and precision. The benefits of using a meat probe are numerous: accurate temperature monitoring, preventing foodborne illnesses, and saving time and effort.
To ensure that your meat probe provides accurate readings, it’s crucial to calibrate it before each use. Inserting the probe into the thickest part of the meat at a slight angle without touching any bones or fat is key to getting an accurate reading. Once you’ve done this, simply plug in the other end of the probe to your Traeger grill and let the magic happen.
Using the controller on your Traeger grill allows you to monitor temperature readings with ease. You can set alarms for when your meat reaches the desired internal temperature or has cooked for a specified amount of time. Before using the meat probe, visually inspecting your cooked meats ensures they’re safe to eat.
After use, cleaning and storing your meat probe properly is important to ensure its longevity. By following these simple steps and tips, you can elevate your outdoor cooking game and impress your friends and family with delicious grilled meals every time.
So what are you waiting for?

